Here you enter the 'Host' to install WinVNC on to, specify the 'Username'
to connect as, and the selected user account's password. The username can
be either a local administrative account on the remote host, or a domain
account with administrative privledges. If you are logged into the computer
running VNCPush as a domain administrator and the remote host is a member
of this domain, you can leave the username and password blank.
After specifying the remote host and any credentials necessary for remote
access, you press the 'Push' button. This process will push VNC onto the
remote host and start it as an 'automatic' service. The text window in the
middle of the application will report the progress of the process as well as
any debuging information available.
To open a connection to the remote host, press the 'View' button. This will
connect the VNCViewer application to the remote host specified in the 'Host'
field. To remove VNC from the remote host, press the 'Pull' button. This will
remove VNC as well as all registry entries added by the 'Push' process. The
Pull process will also add additional progress information to the text window
as well as relevant debuging information.
Other buttons include the 'Clear' button, this clears the text / debuging
window. The 'Options' button which provide run-time environment options as well
as access to the ini configuration file. The 'Help' button provides the author's
contact information as well as opens help documentation. The 'Close' button of
course closes the application.
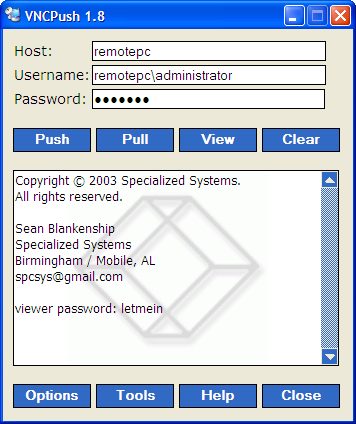 VNCPush - Application Interface