Isolation Mode Choices:
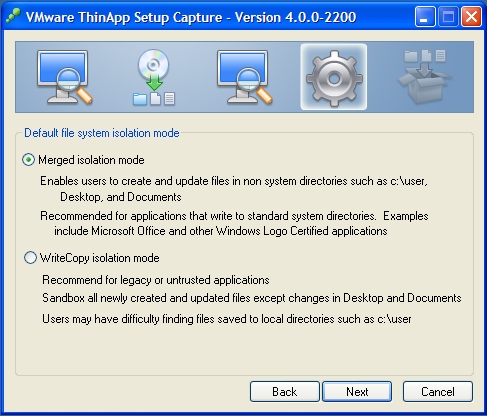
Typically, most applications will be using MERGED for an isolation mode.
The following is taken from VI Thinapp Build Instructions...
Delete the following folders as they should not be needed for anything:
%COOKIES%
%DRIVE_C%
%HISTORY%
%INTERNET CACHE%
%PROFILE%
%COMMON APPDATA%\VMware
ThinApp 4.0.1 resolves some of the isolation mode issues so you don't have to
manually specify them in ##attributes.
Compress only a Part of the Project
You could specify specific folders to compress instead of compressing the whole
project. Add this to the folders ##Attributes.ini file:
[Compression]
CompressionType=Fast
--------------------------------------------------------------------------------
VMware Server Console Error
VMware Server Console unrecoverable error: (vmui)
Cannot get temporary directory for log file.
A core file is available in "C:\Documents and Settings\spc\Application Data\VMware\vmware-1020.dmp".
Please request support and include the contents of the core file.
To collect files to submit to VMware support, run cscript vm-support.vbs.
We will respond on the basis of your support entitlement.
Create:
%TEMP%
%TEMP%\##Attributes.ini
[Isolation]
DirectoryIsolationMode=WriteCopy
No, you don't need to edit Package.ini. You do need to make sure that there's a correct ##Attributes.ini file in the %Temp% directory that you created:
[Isolation]
DirectoryIsolationMode=WriteCopy
--------------------------------------------------------------------------------
Step by Step Instructions on How to Package Microsoft .NET Framework
http://blogs.vmware.com/thinapp/2008/11/step-by-step-in.html
Step by Step on How to Create a ThinApp Package of the VI 2.5 Client
http://blogs.vmware.com/thinapp/2008/11/step-by-step-on.html
VMware ThinApp Pre-Scan Snapshot File Backups
http://blogs.vmware.com/thinapp/2009/01/custom-use-of-s.html
--------------------------------------------------------------------------------
Office 2007 Example
http://blogs.vmware.com/thinapp/2008/10/how-to-thinap-1.html
Typically, most applications will be using MERGED for an isolation mode.
The following are suggested post-capture customizations.
Delete the following folders as they should not be needed for anything:
%COOKIES%
%DRIVE_C%
%HISTORY%
%INTERNET CACHE%
%PROFILE%
%COMMON APPDATA%\VMware
If you do not want any customizations inserted into your Office 2007 package, delete the contents of the %APPDATA% except the ##ATTRIBUTES.INI file. This will enforce the user get a cleanly configured office.
Outlook Modifications:
NOTE: Of the many areas where Outlook stores User Account data, this registry is one of them. When Outlook is started for the first time, it checks if this registry entry to see if it exists and, if not, prompts the user to create a new account. While this works fine when running the ThinApp package of Office Outlook 2007 on a system that DOES NOT have Office Outlook installed, it fails to work correctly when running the ThinApp package of Office Outlook on a Windows system that DOES have Office Outlook installed. Therefore, Full Isolation Mode is required for the registry keys and files of the ThinApp version of Office Outlook so that it can store its settings correctly in order to not interfere with the locally installed version of Office Outlook.
HKEY_CURRENT_USER.TXT file isolation modifications:
isolation_full HKEY_CURRENT_USER\Identities
isolation_full HKEY_CURRENT_USER\Software\Microsoft\Windows NT\CurrentVersion\Windows Messaging Subsystem\Profiles
Create/Modify the ##Attributes.INI file with DirectoryIsolationMode set to FULL in the following folders:
%AppData%\Microsoft\AddIns
%AppData%\Microsoft\Office
%AppData%\Microsoft\Outlook
%Local AppData%\Microsoft\FORMS
%Local AppData%\Microsoft\Outlook
HKEY_CURRENT_USER.TXT Outlook Secure Temp folder modifications:
Look for "isolation_full HKEY_CURRENT_USER\Software\Microsoft\Office\11.0\Outlook\Security" (add it if it does not exist) and add the following entries below it.
Value=OutlookSecureTempFolder
REG_SZ~%Profile%\Local Settings\OutlookTemp#2300
ADDITIONAL NOTE: If you wish for the OutlookTemp folder to be more secure, you can modify the folder path to be whatever you like.
--------------------------------------------------------------------------------
May I ask if, before BUILD the package, it's possible to:
1) delete the folder %SystemRoot%\Installer\$PatchCache$\Managed ?
2) delete the *.msi *.msp files int the folder %SystemRoot%\Installer?
You should be able to delete those...I don't see why you couldn't. But you should test this as it may disable any "auto-repair" functions in Office as well as other features.
Office 2007 keeps a copy of the install files so it's also a good idea to remove the MSOCACHE folder from the C:\ drive (it's a hidden folder) before performing the second scan. If you missed this step you can still remove it beofre building your package by removing MSOCACHE from the Package's %drive_C% location.
Something to remember on removing the MSOCache and %SystemRoot%\Installer directories from the package, and that is some icons are derived from files within these locations. For example, most of the Office icons come from the %SystemRoot%\Installer\{90120000-0030-0000-0000-0000000FF1CE} folder. So if you remove this folder and then build your package, your icons will not look right and will also affect the icons for files associated with those applications. My suggestion with office2k7 is to remove the following:
1) MSOCache as these .exe files are not entry points
2) everything in the %SystemRoot%\Installer folder except the {90120000-0030-0000-0000-0000000FF1CE}, and {90120000-006E-0409-0000-0000000FF1CE} folders.
--------------------------------------------------------------------------------
Patching is generally dependent upon the application - specifically if the patch can be applied "through" the application or not (i.e. Installing a plugin to Firefox or IE is essentially "patching" the browser to view something).
You have, essentially, two options:
1. Patch within the application and use SBMERGE.EXE to import the sandbox to the capture
2. Completely recapture the office installation with the patches installed.
Now, you should ask yourself if it would be better to do option 1 or option 2.
Generally, if it's a service pack or major update, I'd say go with option 2. Otherwise, if it's a simple patch or group of patches, I'd say go with option 1.
For Office (any recent version), here's where enabling the IEXPLORE.EXE entry point in the PACKAGE.INI comes in handy. If you've enabled that in your original package, you can open it and browse to http://office.microsoft.com and follow the above procedure from step 12 on. Once your updates are applied to your sandbox, use SBMERGE.EXE to dump your sandbox back to your package.
IMPORTANT!: It is highly recommended that you make COPIES of your original Office captures, name it accordingly, and then apply the SBMERGE to that copy.
Additionally, it is also recommended prior to applying the patches this way that you start with a fresh sandbox (watch out that you don't accidentally apply any user settings either like name and initials).
--------------------------------------------------------------------------------
--------------------------------------------------------------------------------