Using DOS and Windows 3.1
DOS and Windows 3.1 are the only operating systems
covered in this chapter that do not have any built-in network clients. In
order to connect a computer running these operating systems to a Windows
98 network, you must install a separate client program available from
Microsoft.
The Microsoft Network Client 3.0 for MS-DOS is available
as a free download from Microsoft's FTP site at ftp://ftp.microsoft.com/bussys/Clients/MSCLIENT.
The same client is also furnished with the Windows NT Server product,
which has a program called the Network Client Administrator that creates
installation and boot disks containing the client files.
Like DOS itself, the client is not new technology, and
you may in some cases have trouble finding drivers for the latest network
interface cards. However, this client provides support for all of the
standard networking protocols (NetBEUI, TCP/IP, and IPX/SPX) and enables
you to access the drives and printers shared by other machines on the
network.
Warning: The Microsoft Network Client for
MS-DOS is just that, a client, and does not provide any server
functions. This means that while you can access shares on other
computers, you cannot share the resources on the DOS machine with
the rest of the network. This may be a major inconvenience for the
administrator, as well as for users requiring access to the files
stored on DOS systems.
The other major drawback of using this client is the
amount of conventional memory it requires. The DOS client runs in real
mode, meaning that the system processor is emulating the old Intel
8088 and 8086 processors. Real mode drivers cannot access extended memory
(the memory above the first megabyte in the computer) and therefore
utilize the conventional memory needed by applications.
A full installation of the client with all of its
optional features can utilize as much as 360 K of conventional memory,
sometimes reducing the amount of available memory to the point that you
cannot run Windows 3.1 or other applications. Memory management is one of
the fundamental problems of DOS, and is itself a good reason to upgrade to
Windows 95.
Tip: If you currently use DOS with Windows
3.1, you can evade the conventional memory requirements of the
Microsoft Network Client for MS-DOS by upgrading to Windows for
Workgroups, which uses protected mode (rather than real mode)
drivers that load into extended memory. The functionality and
graphical interface of Windows for Workgroups is virtually identical
to that of Windows 3.1, except for additional networking features
such as drive and printer sharing and the ability to access network
resources through the File Manager
application.
DOS Client Architecture
The Microsoft Network Client for MS-DOS provides many of
the same features as the Windows 98 client, in a package that runs on
virtually any DOS PC. The following sections examine some of the client's
components and how they function to provide networking functionality to
DOS and Windows 3.1 applications.
Network adapter drivers
Like all of the Microsoft network clients, the client for
MS-DOS uses an NDIS (Network Device Interface Specification) driver for
the network interface card installed in the computer and additional
drivers for the protocols that you choose during the client installation.
The NDIS driver in this case conforms to version 2.0 of the NDIS standard.
NDIS 2.0 NIC drivers are 16-bit modules with a .dos file name
extension, written in assembly language, that run in real (as opposed to
protected) mode on the computer. This means that the drivers load before
the Windows GUI and run in conventional memory.
Other versions of Windows, such as Windows for
Workgroups, Windows 95, and Windows 98, also include NDIS 2.0 drivers, but
they are intended for use only when it is not possible to run the enhanced
mode drivers included with those operating systems. For example, when you
press the F8 key while booting a Windows 98 machine and select Safe Mode
with Network Support, the system loads its real-mode NDIS 2.0 drivers to
provide basic networking capabilities.
Redirectors
The module that provides the basic network client
functionality is the redirector, that functions in much the same
way as the redirector in the Windows 98 Client for Microsoft Networks.
This module determines whether a resource requested by an application is
located on a local or network device and sends the request to the
appropriate place.
The client includes two redirectors: basic and
full, that trade off performance for memory utilization. The
basic redirector provides simple access to network drive and printer
shares using any of the supported protocols. The redirector module itself
only uses 10 K of memory, and will run on any PC with an 8088 processor or
better. The full redirector is faster and provides additional functions,
such as domain logons, and is required if you will be running Windows 3.1
or RAS with the client. The full redirector requires 88 K of memory and an
80286 processor or better. The client uses the full redirector by default,
but if you will be running DOS only, you can save a great deal of memory
by installing the basic redirector instead.
Note: The memory requirements of 10 K and 88
K for the basic and full redirectors (respectively) refer only to
the memory required by the redirector itself. The protocol drivers
for the client have their own memory requirements.
Protocols
The client also includes drivers for the three standard
networking protocols that Microsoft systems use at the network transport
layer. Just like on a Windows 98 system, you can elect whether to use
NetBEUI, TCP/IP, or IPX for your basic networking tasks, plus Microsoft
DLC for network printing. The decision regarding which protocol(s) to use
is a more strategic one on MS-DOS systems than on Windows 98, because you
must balance the functionality you require with the limited amount of
conventional memory available on the machine and the more rudimentary
memory management capabilities of the DOS operating system.
As with Windows 98, NetBEUI is a good choice for a small
network, with the added benefit in DOS that it requires a much smaller
memory footprint than TCP/IP. However, if you want to access the Internet
or intranet services from a DOS machine running Windows 3.1, you will have
to use TCP/IP. The Microsoft Client for MS-DOS does not support
connectivity to NetWare networks, so the choice of Nwlink, Microsoft's
version of the IPX protocol, is impractical here.
Network browsing
The Microsoft Client for MS-DOS cannot function as a
master browser on the network. The master browser is a computer that is
responsible for maintaining the list of other computers and shares on the
network. Other systems use this list to browse through the available
resources on the network using applications like the Network Neighborhood
in Windows 98 Explorer, File Manager in Windows for Workgroups, and the
pop-up interface in the DOS client.
One computer on the network is designated as the master
browser as a result of an election between all of the computers capable of
functioning as a browser. Since the client for DOS cannot function as a
browser, it cannot be elected as master browser. In order to be able to
browse the network using the DOS client, there must be a computer running
Windows for Workgroups, Windows NT, Windows 95, or Windows 98 on the
network to function as the master browser.
If you have a network that consists only of computers
running the Microsoft Client for MS-DOS, then none of the systems will be
able to browse the network. However, the ability to browse the network is
separate from the ability to connect to network shares. Even if there is
no master browser, it is still possible to connect to a share by
specifying its UNC name in the normal manner.
Pop-up Interface
The Microsoft Client for MS-DOS includes an optional
pop-up interface that you can use to browse among the shares on the
network and map shares to drive letters. To load the interface, you must
select Run Network Client and Load Pop-up on the client installation
program's Setup Options screen. You can then activate the interface by
pressing the Ctrl+Alt+N key combination (by default), which displays a
screen like that shown in Figure 8-1. You can select a different letter
for the key combination during the client installation process.
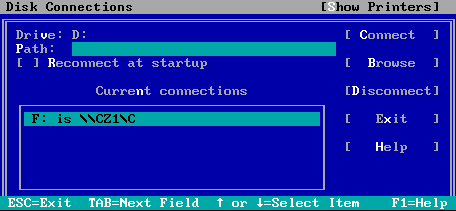
Figure 8-1: The client's pop-up interface provides a simplifies means for managing connections to network shares.
The pop-up interface provides a relatively intuitive
mechanism for mapping drive letters that is simpler than the NET USE command at the DOS prompt and
enables you to map drives without shelling out of an application, but the
cost is high. The interface consumes 34 K of memory, 26 K of conventional
and 8 K of upper memory (if available). Given the amount of memory
consumed by the other client components, the pop-up interface is usually
not worth loading at boot time, since the same interface appears when you
use the NET command at the DOS prompt. You can also load the pop-up interface into memory at will
and unload it afterwards using the NET START POPUP and NET STOP
POPUP commands.
On a small network, you would be better off creating
persistent connections to all of the other shares the user will need, so
that they do not have to create any additional drive mappings of their
own.
Memory requirements
Depending on which of the DOS client’s features you
choose to load, the amount of memory it consumes can range from a total of
66,672 bytes to as much as 371,824 bytes! At its largest, the client
leaves very little memory for applications to use. In fact, the client
setup program itself requires 429 K, and would not run with a full
installation loaded into conventional memory. Fortunately, there are many
modules that can use upper memory for some or all of their code, and with
proper memory management techniques, you can lessen the burden of the
client on your systems.
Tip: as mentioned earlier, the most prudent
action if you’re currently running DOS with Windows 3.1 is to
abandon the Client for MS-DOS entirely and upgrade your systems at
least to Windows for Workgroups, if not to Windows 98. Windows for
Workgroups presents users with the same graphical interface as
Windows 3.1, but uses enhanced mode network drivers that do not
require excessive amounts of conventional memory to run.
Even with judicious use of upper memory, however, your
will probably have to limit the client features you choose to install, in
order to save on conventional memory. The 371,824 byte figure mentioned
earlier is for a complete client installation that includes all three
network transport protocols (NetBEUI, TCP/IP, and IPX), as well as the
pop-up interface and the modules required to run Windows Sockets
applications, such as web browsers. The following listing is an excerpt
from the DOS MEM command output for a system with the complete client
loaded, showing only the modules installed by the DOS client and the
memory they consume:
  Name     Total =   Conventional   +   Upper Memory
  -------- ----------------   ----------------   ----------------
  IFSHLP   3,968    (4K)3,968    (4K)    0    (0K)
  PROTMAN  2,560    (3K)2,560    (3K)    0    (0K)
  ELNK3    9,328    (9K)    0    (0K)9,328    (9K)
  NDISHLP  1,440    (1K)    0    (0K)1,440    (1K)
  PROTMAN  400      (0K)    0    (0K)  400    (0K)
  REDIR    118,224  (115K)    114,416  (112K)3,808    (4K)
  NETPOP   34,832   (34K)     26,144   (26K)8,688    (8K)
  NETBEUI  37,776   (37K)     37,104   (36K)  672    (1K)
  NWLINK   10,144   (10K)     10,144   (10K)    0    (0K)
  TCPTSR   77,056   (75K)  272    (0K)     76,784   (75K)
  TINYRFC  18,224   (18K)     18,224   (18K)    0    (0K)
  NMTSR    6,160    (6K)  6,160    (6K)    0    (0K)
  UMB960            (1K)  272    (0K)  688    (1K)
  NEMM     672      (1K)    0    (0K)  672    (1K)
  TCPDRV   1,328    (1K)    0    (0K)1,328    (1K)
  DNR      14,512   (14K)     14,512   (14K)    0    (0K)
  SOCKETS  34,240   (33K)     34,240   (33K)    0    (0K)
The first group of modules in the listing includes the
IFS manager (IFSHLP, which passes data to the proper device depending on
whether the requested resource is local or remote), the protocol manager
(PROTMAN, which binds the protocol drivers to the NDIS network adapter
driver), the network adapter driver (ELNK3), and other components that are
required for every client installation. Notice that much of the code for
these modules can load into upper memory, thus conserving conventional
memory for applications.
The REDIR module is the full redirector, which in this
case includes the additional network buffers. This is by far the largest
single module, in terms of conventional memory consumption, but you can
reduce its size considerably by omitting the extra network buffers (as
described in "Setting network buffers," later in this chapter), or by
installing the basic redirector instead of the full one.
If you are running Windows 3.1, you must use the full
redirector, but you can still save the 10 to 20 K devoted to the extra
network buffers. If you plan to run DOS only, the basic redirector (which
shows up in the MEM listing as BASIC) requires only about 13 K, which is
obviously a dramatic improvement.
The NETPOP module is the pop-up interface. Omitting this
is the easiest way to save 34 K.
Another way to reduce the memory requirements is to
install only the protocols that you absolutely require. This listing
includes all three, when usually one will be sufficient. NetBEUI and IPX
(provided by the NWLINK module) both require only a single module, while
the entire group of eight modules totaling 153,152 K at the end of the
listing is devoted to TCP/IP.
While TCP/IP requires the most memory of the three
protocols, it is possible to reduce its memory requirement. The DNR and
SOCKETS modules are required only when you will be running Windows Sockets
applications, like web browsers, in Windows 3.1. If you plan to use TCP/IP
only for communications with other computers on the local network, you can
eliminate these modules by removing the lines from Autoexec.bat
that load Dnr.exe and Sockets.exe, thus saving 47 K.
Installing the Microsoft Client for MS-DOS
Because it runs using only the most basic system
resources, you can install and run the Microsoft Client for MS-DOS on
virtually any PC. The minimum system requirements for the software are as
follows:
- Intel 8088 or higher processor for the basic redirector, 80286 for the full redirector.
- 640 K RAM
- 1 MB free disk space
- A network interface card (with an NDIS 2.0 driver, if the card is not supported by the client).
- MS-DOS version 3.3 or higher
You can use the client to make network resources
available to Windows 3.1, but you should not use the client for MS-DOS
with other versions of Windows, such as Windows for Workgroups, Windows
95, or Windows 98.
The client includes an interactive installation program
called Setup.exe that enables you to select and configure the
features you want to install. The program then copies the appropriate
files to the directory of your choice (C:\Net, by default),
modifies the configuration files for the client (Protocol.ini and
System.ini), and adds the appropriate commands to the system's
Config.sys and Autoexec.bat files to load the client when
the system boots.
Note: The client's Setup.exe program
requires 429 K of conventional memory to run. You may have to use
the Memmaker utility in MS-DOS 6.x or manually adjust the commands
in your Config.sys and Autoexec.bat files to free up
this much RAM.
Network adapter detection
If the Microsoft client includes a driver for the network
card installed in the computer, it may detect it automatically, or present
you with a list of supported NICs from which you can choose (see Figure
8-2). If your card is not supported by the drivers shipping with the
client, you can usually obtain an NDIS 2.0 driver from the manufacturer’s
web site or other online service. An NDIS 2.0 driver package typically
consists of the driver itself, which has a .dos extension, a
.nif file, which provides recommended settings for the client
configuration files, and an Oemsetup.inf file, which the setup
program uses to locate the driver file and identify the possible values
for the hardware resource settings.
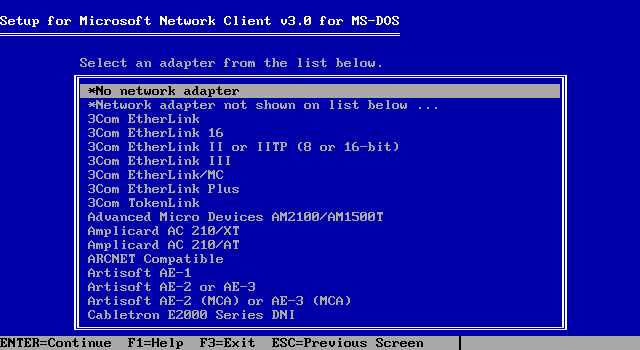
Figure 8-2: The Microsoft Client for MS-DOS NIC driver listing.
Tip: Microsoft Client for MS-DOS includes
drivers for over 100 network interface cards, but since the client
is over five years old, there are many new cards that it doesn't
support. If your specific network interface card is not listed, it
is worth trying the NE2000 Compatible driver, which works with many
different NICs.
To use a driver package obtained from another source,
select Network Adapter Not Shown On List Below and specify the path to the
driver files in the screen provided.
Just like the later version NDIS drivers used in Windows
98, NDIS 2.0 drivers must use the same hardware resources as the network
interface card installed in the computer. If the installation program
successfully identifies the NIC, then it will usually configure the
hardware parameters automatically as well. If it does not, then you will
have the opportunity to modify the hardware parameters later in the
installation.
Tip: If the client's setup program fails to run properly
or hangs up while trying to identify the network interface card, you can
run Setup.exe with the /I parameter, which disables the entire hardware
detection process. You will then have to select the NIC driver you want to
install and the values for the hardware resource parameters.
Setting network buffers
After Setup.exe identifies the network interface
card, the program prompts you to specify whether or not it should install
using more memory for network buffers in order to improve performance.
This is one feature that might want to enable when you first install the
client, but keep it in mind if you find yourself in a situation where you
must minimize the amount of conventional memory that the client uses.
Later, you may want to trade off performance in order to have enough free
conventional memory to be able to run all of your programs. The difference
on an installation of the full redirector when you opt to set up the
client without optimizing performance is a reduction of 10 to 20 K in the
conventional memory used by the redirector module, which is shifted to
upper memory instead.
Selecting a user name
When the client prompts you to specify a user name, you
must supply a name consisting of up to 20 characters, alphabetical,
numeric, or any of the following symbols:
! # $ % ^ & ( ) ` { } ~ _
When the setup program creates the configuration files
for the client, it uses the name you specify here both as the logon name
for the user and the NetBIOS name for the computer. You will have the
opportunity to change both later in the installation.
Setting up the MS-DOS client
The main setup screen shown in Figure 8-3 is where you
configure all of the client's optional features and operational
parameters. This screen also displays the current values of the client's
basic configuration options. As with all of the screens in the setup
program's interface, you make selections by using the cursor keys to
highlight an option and press the Enter key to select it.
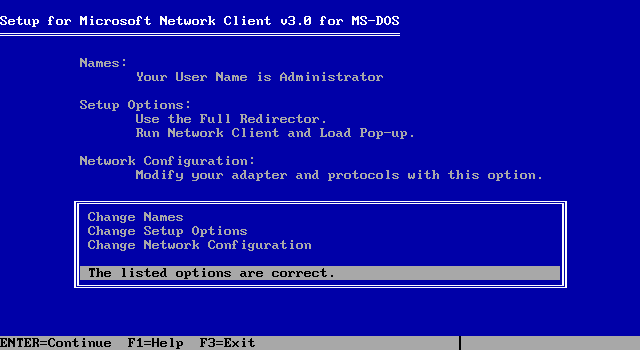
Figure 8-3: The Microsoft Client for MS-DOS uses a menu-driven interface to install and configure the software.
The Change Names screen
When you select Change Names from the main setup screen,
you can specify values for the following options:
Change User Name
Specifies the default name that the client will use when
logging on to the network. The default value is the name you supplied
earlier in the installation. During the logon, you can accept the name you
furnished previously or specify a different one.
Change Computer Name
Specifies the NetBIOS name that will identify the
computer to the rest of the network. By default, the setup program uses
the same user name supplied earlier in the installation. In most cases, it
is better to give computers names that are independent of their users, so
that you don't have to change them when a person changes jobs or leaves
the company.
Change Workgroup Name
Specifies the name of the workgroup that the computer
will join when logging on to the network. The workgroup name you supply
should already exist on your network.
Change Domain Name
Specifies the name of a Windows NT domain that the
computer will join when logging on to the network. For a small
peer-to-peer network, this parameter is not
needed.
The Change Setup Options screen
On the Change Setup Options screen (see Figure 8-4), you
specify the basic options for the client installation. These options
largely determine the amount of memory that the client will require and
functions it will provide.
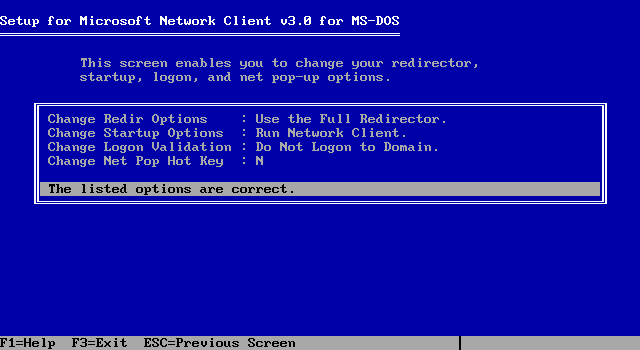
Figure 8-4: The Change Setup Options screen enables you to select the functions provided by the client.
The available options are as follows:
Change Redir Options
Specifies whether you want to install the basic or full
redirector. The default is to install the full redirector.
Change Startup Options
Specifies how the setup program should configure the
client to load when the system starts, using the following
options:
- Run Network Client (default)
- Run Network Client and Load Pop-up
- Do Not Run Network Client
Change Logon Validation
Specifies whether or not the client should log on to the
domain specified in the Change Names screen. The default is not to log on
to the domain.
Change Net Pop Hot Key
Specifies the key that will activate the pop-up interface
when pressed with the Ctrl and Alt keys. The default value is N.
The Change Network Configuration screen
The Change Network Configuration screen (shown in Figure
8-5) is where you select and configure the protocols to be installed by
the setup program and modify the hardware configuration parameters for the
network adapter driver. The screen contains two boxes, one listing the
currently installed network adapters and protocols, and the other listing
the functions you can perform.
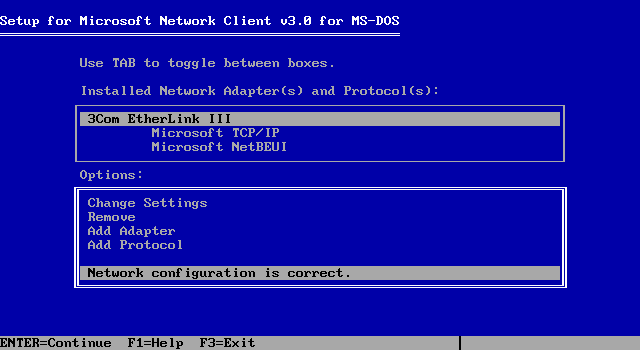
Figure 8-5: The Change Network Configuration screen contains the network adapter and protocol configuration options.
The basic functions of this screen are to add modules to
or remove them from the list of installed adapters and protocols and to
configure the installed modules. The driver for the adapter that the setup
program detected earlier should already be present in the top box. You can
select the protocols to install or delete by using the cursor keys to
highlight Add Protocol or Remove in the Options box and pressing Enter to
select it.
To work with a particular module in the list of installed
adapters and protocols, you press the Tab key to shift the focus to the
top box and select the desired module with the cursor keys. After tabbing
back to the Options box, you can select a function to be performed on the
highlighted module.
The Change Settings function displays a customized
configuration screen for the selected module. When you highlight the
installed network adapter and proceed to change its settings, you see a
screen listing the hardware resources required by that card. By selecting
one of the parameters and pressing Enter, you display a list of the
possible values for that parameter from which you can choose.
The settings for the NetBEUI protocol are the same as
those is Windows 98. The Maximum Sessions parameter has a default value of
10 and the NCBS parameter has a default value of 12. For more information,
see "Configuring NetBEUI settings" in Chapter 6, Installing
Network Hardware.
The TCP/IP protocol is the only one of the protocol
modules that requires configuration before use on a peer-to-peer network.
The Microsoft Client for MS-DOS supports automatic TCP/IP configuration
via a DHCP server, but since this requires a Windows NT server on the
network, you will have to configure the protocol manually.
When you highlight the TCP/IP protocol module and select
Change Settings, you see the screen shown in Figure 8-6, which contains
the following parameters:
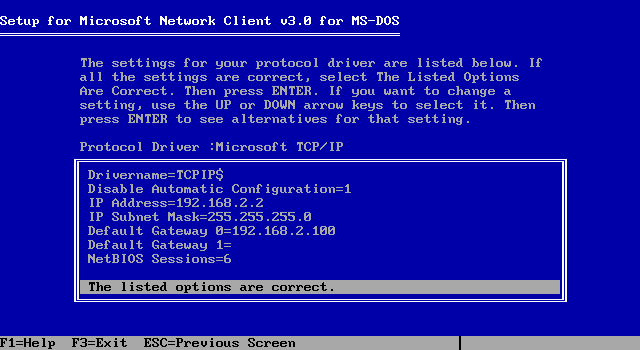
Figure 8-6: Unless you have a DHCP server on your network, you must configure the TCP/IP settings before the protocol will function.
Disable Automatic Configuration
Specifies whether or not the client should request TCP/IP
configuration settings from a DHCP server on the network. The default
value is 0, which
enables the DHCP client. On a peer-to-peer network, you should change the
value to 1, which
disables the DHCP client and enables you to specify values for the
configuration settings manually.
IP Address
Specifies the unique IP address to be assigned to the
network interface card in the computer. Since the Protocol.ini
file, where these settings are stored, uses only integers, the four
decimal values (called octets) that comprise the address must be
separated by spaces and not periods as in standard IP address
notation.
IP Subnet Mask
Specifies the mask used to separate the network bits in
the IP address from the host bits, using four octets separated by
spaces.
Default Gateway 0
Specifies the IP address of the system that serves as the
gateway to other networks, using four octets separated by spaces. On a
small peer-to-peer network, you only have to supply a value for this
option if you are connecting to the Internet through a shared connection
on another machine.
Default Gateway 1
Specifies the IP address of an alternate gateway to other
networks, should Default Gateway 0 fail, using four octets separated by
spaces.
NetBIOS Sessions
Specifies the maximum number of NetBIOS sessions the
client can have open at any one time. The possible values range from
1 to 12, and the default value is
6.
Tip: See "Configuring TCP/IP Settings" in Chapter 6,
Installing Network Hardware, for more information on
selecting IP addresses and values for the other configuration
settings.
Completing the installation
Once you have configured the options you want to install,
select The Listed Options are Correct and the program will proceed to copy
the required files and modify the configuration files, including your
Config.sys and Autoexec.bat. When you reboot the system, the
client will load, log on using the name you supplied earlier, and prompt
you for a password. Once you're logged on you can connect to network
resources using the NET command or load Windows 3.1.
Changing Options
If you want to modify the client configuration after the
installation is complete, you can run the Setup.exe program from the
directory in which you installed the client (typically C:\Net). The
program functions just as it did during the installation, enabling you to
modify any of the parameters accessible from the main setup screen.
If for any reason (such as a shortage of conventional
memory) you cannot run the setup program, you can also make manual changes
to the client's configuration files. These files use the same names as
Windows configuration files and have the same basic structure, but they
are stored in the C:\Net directory and should not be confused with
the identically-named files used by Windows.
System.ini parameters
The System.ini file in the C:\Net directory
(by default) stores many of the parameters that you configured when you
installed the client. You can modify your settings at any time by changing
them in this file and rebooting the system to put your changes into
effect. The following directives are all located under the [Network] heading of the file and
consist of a parameter and a value, separated by an equals sign ("=").
Tip: The same basic System.ini file is used
by other early clients for LAN Manager and other products, which
explains why some of the directives included in the default file
have no effect on the Microsoft Client for
MS-DOS.
filesharing
Not used by the Microsoft Client for MS-DOS, as the
software does not support the sharing of files on the client system. The
default value is no.
printsharing
Not used by the Microsoft Client for MS-DOS, as the
software does not support the sharing of printers on the client system.
The default value is no.
autologon
Specifies whether or not the system should automatically
log on to the network during the boot process. The default value is
yes.
computername
Specifies a unique NetBIOS name for the computer that
will identify it to the other systems on the network. The default is the
value you specified during the client installation.
lanroot
Specifies the name of the directory in which you
installed the client. The default value is C:\Net.
username
Specifies the default name that the client will use when
logging on to the network. The default is the value you specified during
the client installation, but you can supply a different name during the
logon.
workgroup
Specifies the name of the workgroup that the computer
will join when logging on. The default is the value you specified during
the client installation.
reconnect
Specifies whether or not the client should reconnect to
the shares that you mapped to drive letters during the previous session.
The default value is yes.
dospophotkey
Specifies the key that activates the pop-up interface,
when you press it with the Ctrl and Alt keys. The default value is
N.
lmlogon
Indicates whether or not the client should log on to the
Windows NT domain specified by the logondomain directive. The default
value is 0, meaning that
the client should not log on to the domain. To activate the domain logon,
change the value to 1.
logondomain
Specifies the name of the domain that the client will log
on to, if the value for the lmlogon directive is 1. The default is the value you specified during the client
installation.
preferredredir
Specifies whether the client should load the basic
redirector or the full redirector when executing the NET START command. The possible
values are basic and
full; the default is the
value you specified during the client installation.
autostart
Specifies whether the client should load the client
during system startup and whether the pop-up interface should load. The
value is taken from the redirector and the startup option that you chose
during the client installation. Possible values are basic or full, with POPUP optionally added
after a comma (e.g.: autostart=full,popup). If you
selected Do Not Run Network Client as the startup option, the value for
this directive is left blank, but the NET
START command is still added to the Autoexec.bat
file.
maxconnections
Not used by the Microsoft Client for MS-DOS. The default
value is 8.
sizworkbuf
Specifies the size of the work buffers that the client
uses during SMB (server message block) communications with other systems
on the network. The default value is 1498 when you elect to optimize
performance with extra network buffers during the client installation, as
discussed in "Setting network buffers," earlier in this chapter. If you
choose not to install the extra buffers, this entire directive is
omitted.
Protocol.ini parameters
The Protocol.ini file contains the configuration
parameters for the individual protocols, some of which you can modify
directly. The [TCPIP]
section of the file, as shown in the following excerpt, contains the
directives corresponding to the settings you configured during the client
installation (see "The Change Network Configuration screen," earlier in
this chapter). You can modify them at will, and your changes will take
effect when you next reboot the system.
[TCPIP]
NBSessions=6
DefaultGateway0=192 168 2 100
SubNetMask0=255 255 255 0
IPAddress0=192 168 2 2
DisableDHCP=1
DriverName=TCPIP$
BINDINGS=MS$ELNK3
LANABASE=0
In the same way, the [MS$NETBEUI] section contains the
directives for the Maximum Sessions and NCBS parameters. For general
networking tasks, you should usually not have to modify the values for
these parameters.
[MS$NETBEUI]
DriverName=netbeui$
SESSIONS=10
NCBS=12
BINDINGS=MS$ELNK3
LANABASE=1
Windows 3.1 and the Microsoft Client for MS-DOS
The Microsoft Client for MS-DOS provides access to the
network both for DOS applications and for Windows 3.1. Although Windows
3.1 does not contain a network client of its own, it does have modules
that enable applications like File Manager to make use of a real mode
client installed and loaded before you launch Windows.
Installing Windows 3.1 Networking Support
To install Windows 3.1's networking support, you launch
the Windows Setup application in the Main program group and select Change
System Settings from the Options menu. This displays the Change System
Settings dialog box shown in Figure 8-7. In the Network field, select
Microsoft Network (or 100% compatible) and supply the location of the
Windows 3.1 distribution files when the program requests them.
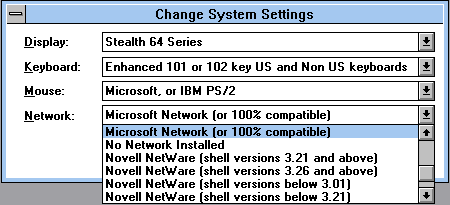
Figure 8-7: Windows 3.1's networking support provides access to the function of the DOS client with the GUI.
Once you restart Windows with this change in effect, the
File Manager application contains a Network Connections command in the
Disk menu that provides GUI access to the drive mapping functions provided
by the NET command at the DOS prompt.
Installing Windows Sockets Support
Although it is not obvious from the installation process,
the Microsoft Client for MS-DOS does have the capability to resolve DNS
names and to support Windows Sockets (Winsock) applications like web
browsers in Windows 3.1. Unfortunately, the setup program does not
properly configure the client to do these things, so you must modify the
configuration files manually. Use the following procedure to enable
Windows Sockets support and load the Domain Name Resolver (DNR):
- Expand the compressed Wsahdapp.ex_ file supplied with the
client distribution files and copy it to the C:\Net directory (or
to whichever directory you chose when installing the client. To expand
the file, you use the Expand.exe utility included with both DOS
and Windows 3.1, using the following syntax:
Expand Wsahdapp.ex_ Wsahdapp.exe
- Edit the Autoexec.bat file and add two lines loading the
Dnr.exe and Sockets.exe programs from the C:\Net
directory, just before the NET
START command. The part of the file that loads
the client components should appear as follows:
C:\NET\netbind.com
C:\NET\umb.com
C:\NET\tcptsr.exe
C:\NET\tinyrfc.exe
C:\NET\nmtsr.exe
C:\NET\emsbfr.exe
c:\NET\dnr.exe
c:\NET\sockets.exe
C:\NET\net start
- Edit the Tcputils.ini file in the C:\Net directory and
add a new section that appears as follows, with the
nameserver0 and
nameserver1 directives specifying the IP addresses of DNS servers (supplied by your ISP).
[dnr]
drivername=DNR$
bindings=TCPIP
nameserver0=192 168 100 3
nameserver1=192 168 100 4
- In the [tcpglobal]
section of Tcputils.ini, add the directive
hostname=name, where
name is the computer name or any other logical name for the
system.
- Modify the bindings=TCPIP_XIF directives in the Tcputils.ini file to read
bindings=TCP, so that
it references the correct section in the Protocol.ini file. The
modified Tcputils.ini file should appear as follows:
[tcpglobal]
drivername=GLOBAL$
hostname=cz2
[sockets]
drivername=SOCKETS$
bindings=TCPIP
numsockets=4
numthreads=32
poolsize=3200
maxsendsize=1024
[telnet]
drivername=TELNET$
bindings=TCPIP
nsessions=0
max_out_sends=0
[dnr]
drivername=DNR$
bindings=TCPIP
nameserver0=192 168 100 3
nameserver1=192 168 100 4
Once you restart the system, you should be able to run a
web browser or other Internet application in Windows 3.1 normally.
Using the Microsoft Client for MS-DOS
Once the Microsoft Client for MS-DOS is installed and
loaded, you can use it to map drive letters to network shares. From the
DOS prompt, you do this with the NET command. In Windows 3.1, any drives that you have already
mapped are available to all of your applications, and you can map
additional drives using the Network Connections dialog box in File
Manager.
Using the NET Command
Net.exe is a very powerful command-line utility that
you can use to view and manipulate network resources in many different
ways. All of the other Microsoft network operating systems, including
Windows for Workgroups, Windows NT, Windows 95, and Windows 98, include
the program and use the same syntax.
NET
Displays the pop-up interface, enabling you to browse the
network shares and map drives.
NET CONFIG
Displays information about your network connection,
including the computer name, the name of the user logged on, and the
workgroup name.
NET DIAG
Uses the Microsoft Network Diagnostics program to test
the connection between two network computers. When you run the NET DIAG
command, the system searches for a diagnostic server on the network. If no
diagnostic server is found, the system begins functioning as a diagnostic
server itself, until you press a key to terminate the program. When the
system detects a diagnostic server, the two machines connect and exchange
test messages to determine if the network is functioning
correctly.
NET HELP
Displays a summary of Net.exe's functions. To see
more detailed information about a specific command, use NET HELP command or
NET command /?., where command is a valid NET command. For information about an
error message, use NET HELP error, where error is a valid error message
number.
NET INIT
Loads the client's network adapter and protocol drivers
without binding them to the protocol manager. The client installation
program adds this command to the computer's Config.sys
file.
NET LOGOFF
Closes all connections with network shares and logs the
user off of the workgroup. To reconnect to the network, you must use the
NET LOGON
command.
NET LOGON
Logs the system onto the network and re-establishes all
persistent connections to network shares. When you issue the NET LOGON command with no additional
parameters, the program logs you on using the default user name you
furnished during the client installation and prompts you for a password.
You can also specify a user name and password on the command line using
the following syntax:
NET LOGON username password
By default, the program will ask you if you want to
create a password file for the user if one does not already exist. The
client uses the password file (which is named using the first eight
characters of the user name plus a .pwl extension) to store the
passwords for the shares you connect to in encrypted form. To skip the
prompt for the creation of the password file, add the /SAVEPW:NO parameter to the
NET LOGON command
line.
NET PASSWORD
Changes the password for a domain user
logon.
NET PRINT
Displays information about print queues and enables you
to manipulate your queued print jobs. To display the contents of a print
queue, use any of the following commands:
NET PRINT \\computer
NET PRINT \\computer\printer
NET PRINT port
where computer is the NetBIOS name of a system
functioning as a print server, printer is the name of a printer
share, and port is the name of a printer port on the system that is
connected to a network printer. To manipulate a queued job, use the
following syntax:
NET PRINT \\computer\printer job
[/DELETE] [/PAUSE] [/RESUME]
where job is the number of the job as listed in
the queue display.
Note: The NET
PRINT command is used only to view and
manipulate print queues. To connect a printer port to a queue, you
use the NET USE
command.
NET START
Loads client services into memory. With no parameters,
the command loads the default redirector you specified during the client
installation process. You can also load specific services from the command
line using the following commands:
NET START BASIC
Loads the basic redirector.
NET START FULL
Loads the full redirector.
NET START WORKSTATION
Loads the default redirector specified during the client
installation.
NET START POPUP
Loads the pop-up interface into
memory.
NET START NETBIND
Binds the network adapter and protocol drivers to the
protocol manager.
NET START NETBEUI
Loads the NetBIOS interface.
NET STOP
Unloads client services from memory, using the following
command line parameters: BASIC, FULL,
WORKSTATION, POPUP, NETBEUI.
Note: You cannot start and stop services
with the NET START
and NET STOP
commands from a Windows 3.1 DOS session. You must exit Windows
entirely to use perform these
actions.
NET TIME
Displays the time on another network system or
synchronizes the computer's time with a time server on the
network.
NET USE
Connects or disconnects the client system from shared
network resources and manages persistent connections. To map a drive
letter to a network share, use the following syntax:
NET USE drive: \\computer\share [password]
where drive is the drive letter you want to map
(or an asterisk, which causes the program to use the next available drive
letter after C:),
computer and share identify a shared drive on the network,
and password is the password needed to access the shared drive.
To connect to a network printer, you use the same syntax
with name of a local port (such as
LPT1) instead of a drive letter, and the name of a
printer share instead of a drive share. This causes all print jobs sent to
the specified port to be redirected to the printer share on the
network.
In either command, you can add the \SAVEPW:NO parameter to prevent the
client from saving the password for the share in the password file on the
local system. This option is useful for administrators who have to access
a special resource from a client system without compromising its
security.
To disconnect a drive letter or port from a share, you
specify either the share name, the drive, or the port in the NET USE command with the \DELETE parameters, as in the
following examples:
NET USE f: \DELETE
NET USE \\cz1\cdrive \DELETE
NET USE lpt1 /DELETE
To manage persistent connections, you use the
/PERSISTENT parameter
with one of the following options:
NET USE /PERSISTENT:YES
Causes all subsequent connections you establish to be
persistent.
NET USE /PERSISTENT:NO
Causes all subsequent connections you establish to not be
persistent.
NET USE /PERSISTENT:LIST
Lists the current persistent
connections.
NET USE /PERSISTENT:SAVE
Changes all currently active connections to persistent
connections.
NET USE /PERSISTENT:CLEAR
Clears all of the current persistent
connections.
You can also use the /PERSISTENT parameter in a
NET USE command with the
YES or NO option when
connecting to a network drive or printer. This causes the connection being
established to be made persistent or non-persistent, as well as setting
the default for all subsequent connections.
NET VER
Displays the type of redirector currently loaded and its
version number.
NET VIEW
Displays the shares on a specific computer or the
computers in a specific workgroup, using the following
syntax:
NET VIEW \\computer
NET VIEW /WORKGROUP:workgroupname
Using the graphical interfaces
The DOS client's pop-up interface and the Network
Connections dialog box in Windows 3.1's File Manager (shown in Figure 8-8)
are different in appearance, but provide essentially the same
functionality. Both enable you to connect drive letters to network shares
by either browsing the network or manually entering UNC names. In the
pop-up screen, you use the Tab key to move around the screen or press the
Alt key with the highlighted letter in one of the various fields to move
the emphasis there.
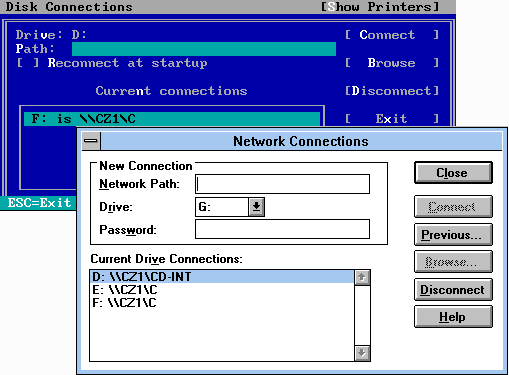
Figure 8-8: Although different graphically, the DOS client’s pop-up interface and the Windows 3.1 Network Connections dialog box operate in much the same way.
After specifying a drive letter and entering or browsing
for a share name, you use the connect command to map the drive, checking
the Reconnect at Startup box (using the spacebar) to create a persistent
connection. The Network Connections dialog box in Windows 3.1 functions in
much the same way, but with the added convenience of the mouse, which is
not supported in the DOS interface.
To connect printer ports to shared printers, you press
the Alt+S key combination in the pop-up interface, which modifies the
display to show ports instead of drives. The Show Queue control displays
the current print jobs waiting for processing in the selected queue, and
enables you to pause, resume, and delete your jobs, just as you can with
the NET PRINT command.
In Windows 3.1, the printer management tools are found in the Print
Manager application, which has a Network Connections dialog box that is
also similar to its drive-sharing counterpart.
The DOS and Windows client tools share the same
underlying infrastructure, so that you can use them interchangeably with
causing a conflict. If, for example, you connect drives and printer ports
to network shares in DOS, you will find that the Windows tools show the
previously established connections as well. If, however, you map a drive
in a Windows 3.1 DOS session, you will find that if File Manager is
already running, it will not show the drive as being mapped. Once you
close the application and restart it, however, File Manager will display
the proper connections.
As mentioned earlier in this chapter, persistent
connections are your best tool when it comes to introducing networking
services to DOS and Windows 3.1 users. Rather than train them how to
connect drives and printers on their own, you are better off doing it
yourself and seeing to it that the system re-establishes the connections
during every reboot. Since you will be working with a relatively small
number of systems on your network, you should not have a huge number of
shares to deal with. You should therefore be able to connect each computer
to all of the shares they need without running out of drive
letters.


